

First – let me say, Odds & Hens has not gone nor forgotten its readers. Thank you for the continued traffic to the site during a brief hiatus. Never fear – this post is ushering in a a whole new set of blog inspiration. The hubs and I are new parents! Our dear Baby BeeMcT joined our family in late December, weighing in at almost 10 pounds! When we are more ready will we share our adoption journey, but for now bask in his totes-adorbness….

DIY Dapper Onsies – dress up a baby wardrobe basic
These snappy onesies were simple to make, require little sewing skill and are a great way to use up scrap fabric and ribbon. I even covered up a few stains as we were gifted some clothing before BeeMcT’s arrival.
Supplies
- scraps of fabric, approx 3 1/2 square piece of fabric for bowtie and 6 inch x 3 inch for neck, not exact but the bigger the onsie the bigger the tie, or to your liking
- ribbon enough length to make suspenders on each side about 24 inches and an inch or two for center of bowtie
- onsies or t-shirts
- thread, needle, scissors, Fray Check (optional)
- sewing machine helps
- For neck tie – some iron on interfacing and paper to draw out necktie shape

1. Make the bowtie. cut the fabric to make an approximate square, fold in half and sew along the raw edges, leaving a small opening in the middle of the edge to turn it right side out.
2. Press the square, sew across the opening and then take your needle and thread, sewing a basting stitch and gather the center, making the ‘bow.
3. Wrap the gathered center of the tie with ribbon scrap and hand sew at the back.

4. Place the bowtie where you would like on once. I positioned just below the ribbed edge. Hand sew it on, tacking down each corner and the center.
5. Make the suspenders. Measure and cut your ribbon to be long enough to go from the shoulder seam on the onsie to down to the bottom near the snaps, with a little extra to fold under, if you have it, (see white once) otherwise, tuck the raw edge under and sew it down (see brown onsie).
6. I used my machine to attach the ribbon with zig zag, but you could hand sew. I tucked the top edge up under the overlapping part to hide raw edge. Tack the ribbon suspender in the middle with a a row of stitches and then sew it at the bottom. I wrapped it around and did a zig zag from the bottom, catching the raw end on the inside.
7. Warning – I wouldn’t leave your kiddo ‘unattended’ as the ribbon suspenders as still a little lose and they might catch their hand it in. But you won’t, because you will be busy staring at them. You could also sew them completely on.
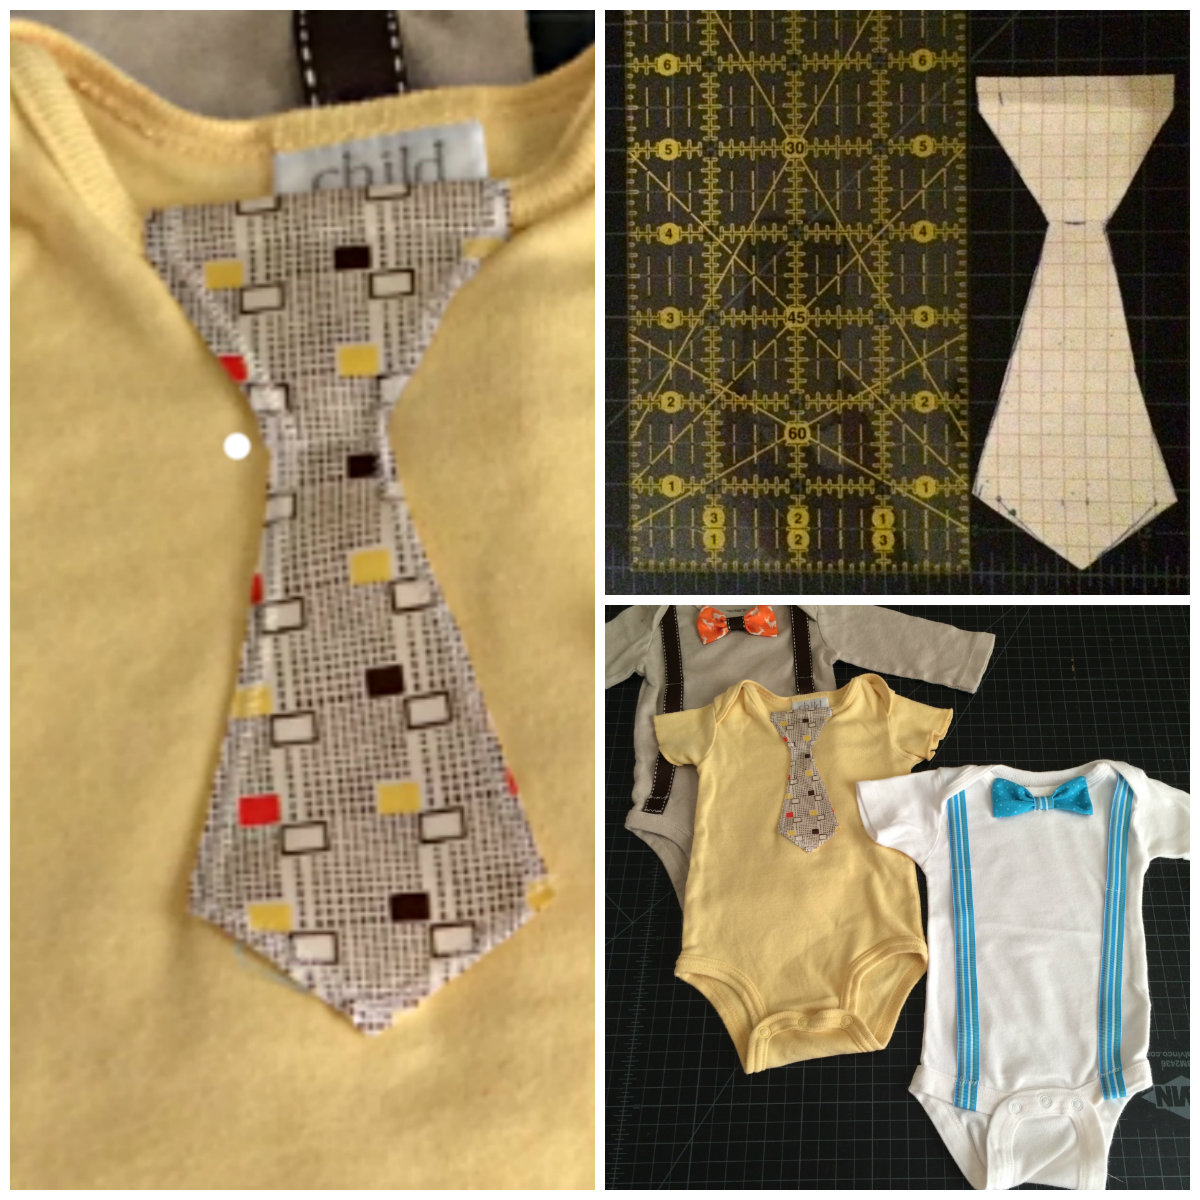
8. For the neck tie, I freehanded a basic necktie, went with wide vs. skinny for more ‘retro’ flare. It measures about six inches long and 2 inches wide. The key is at the top of the tie to add a ‘tab’ that will fold over the neckline to the inside. This is about 3/8 to 1/2 inch tall. you can see it in my quick pattern photo.
9. Trace the pattern onto the iron-on interfacing, cut it out and iron to desired fabric. Cut out tie shape. I finished around the edges with a zig zag stitch, then sewed the tie on the inside/wrong side using the tab, folded it over to the front and then sewed a few stitches were the ‘knot’ (at the white dot) would be to attach the tie to front of onsie… apologies for a tad grainy – wanted to zoom in.
10. Now, take those photos!
