

Upcycle, repurpose and be penny wise with this simple decorating DIY. Painted jars, bottles and vases make wonderful centerpieces for weddings, parties or everyday viewing pleasure. By painting on the inside, you get the illusion of colored glass, smooth to the touch and results in cleaner look. Rest assured that this is not a complicated craft but it took me a very long time finish due to several “craft-astrophies” along the way. I am confident the next time I make a set of painted glass jars, it will be a breeze. Apologies upfront that this is a long post but I feel it is my blog-ly duty to share the fails. Here is my tutorial of how to make your own painted vessels, COMPLETE with lessons learned and thoughts on the various paint options.

Filled with a few stems of flowers, they were the perfect centerpieces for the hub’s birthday party.
Supplies
- Paint (recommend 1-Shot Lettering enamel)
- Newspaper
- Paper towel
- Muffin papers
- Plastic spoons or oral syringes
- Disposable cups
- Wine corks (optional, great for bottles)
- Toothpicks, cotton swaps
- Towels that you can toss when done
- Acetone
- Rubbing alcohol
- Paper plates
- Assorted glass vessels: jars, vases, soda bottles, mason jars
Instructions:
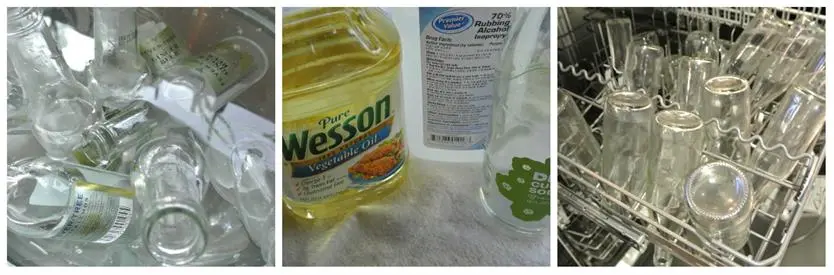
- Prepare the vases by removing the labels, washing inside and out and rinsing with rubbing alcohol. Let them dry fully before applying any paint. This might be good to the night before to decrease temptation.
- To remove labels, I submerge in hot water, soak and then rub the label off, sometimes using cooking oil on paper towel. The labels on the soda bottles peeled right off and rubbing with oil removed the glue. BE CAREFUL! Glass + oil = slippery … but your hands will be soft.
-
TIP: Pour rubbing alcohol into the first clean bottle, swirl around and then dump into the next one. CONFESSION – I used the dishwasher as a drying rack; a tad Asian-momish. My MIL has an extensive collection of plastic dishware stored permanently in her working dishwasher.
-
- TIP: I used soda bottles (Fever Tree, Jones and Fentimans, if curious), a few Mason canning jars, other random glass around the house (the rice wine vinegar bottle is my favorite) and rounded it all out with some inexpensive vases from Value Village. Don’t be afraid to scrounge in your recycle bin – the hubs had some friends over a few nights before I started for Moscow Mules but “forgot” to save me the bottles. I fished them out.
- Cover your work space with several layers of paper and set up for painting.

-
Start painting! Pour, spoon or drizzle in some paint and then start swirling, tilting, turning and inverting the bottle to coat the inside with paint. The wine cork is handy when inverting the bottles. If pouring the paint, spoon the paint out of the can into the cup and then pour. You will have to invert, swirl etc. several times. I rested some of the bottles propped upside down in an empty cup and started applying paint to the others. Here is where having an oral medication syringe would have been helpful. Why I didn’t buy some at work? I don’t know…

- TIP: Do not rush and put a ton in. I started with about 3 spoonfuls. The less you use, the longer (and more patience) it will take to cover the inside but if you use a lot you need to leave them upside down to drain and dry. Out of the small 1-Shot cans, I was able to paint at least twenty pieces, probably more like thirty, as some were done twice (see below) and a few others just bombed (see below).
- After the inside is completely coated, invert the bottle to start draining out the excess. You could use a cup for each of these but I used a muffin paper per bottle. I was then able to pour excess paint back into can/cup. Let this drain for a while (?30 minutes). When you go to lift it up be ready, more paint will come out. Switch out the muffin paper and invert it again. You do not have to wait as long this time.
-
Invert the bottle again this time though it needs to be elevated so that the paint can drain completely out of the bottle. I set mine up on tooth picks on newspaper. Leave the bottles alone. After a while, you can move them to a clean spot on the newspaper to check if paint is still draining out. Do not knock over causing a domino show – not that I would know.

-
After most of the paint has drained out or you have grown weary of waiting, go ahead right the bottles, clean off paint on the outside and rim (or leave the rim painted) and let them dry. This will need to be at least overnight. I suggest drying them outside.

-
TIP: If you google hard enough you will come across some 1-Shot recommendations to speed dry by placing in a 150 oven (page 33/37), DO. NOT. DO. THIS. I tried, granted my oven’s lowest setting was 160F, but I propped the door open! A few dried but the rest it was like the paint evaporated, gone, vamoosed and left me with something spooky. So, basically, I repainted them repeating step 3-5, at midnight.

- TIP: The can will mention that it dries to touch pretty quick. I did not find this to be remotely true for this project, due to application technique and lack of air flow inside the bottle.
- Once good and dry they should hold water for quite some time. My paint held up and I know for a fact not all of them were 100% dry in time for the party, since it took me eighty nine times longer to complete this project..
- Decorate to your heart’s desire, or leave them plain, maybe in clusters. For the birthday party, I used some honey bee ribbon, various stamps and tags, bakers twine and ribbon scraps.

Paint Selection for DIY Vases
- I tried four different kinds of paint. I am not endorsing over the other, just telling you my experience. Of note: I couldn’t located the enamel Martha Stewart line but I would hypothesize it would perform the same as the Folk brand, in terms of thickness, based on feedback from others.

- The Folk Art enamel line was thick and hard to cover the inside of the bottle without using a ton, meaning you could only paint a couple jars and had to wait a very long time for it to drain out the excess. Despite the pretty colors, I would only use this for onesie, twosie projects or using a brush. I also tried thinning it out with enamel paint thinner. Yes, it made it thin but dried really weird when I tried popping into the low heat oven (I swear it recommended the heat drying as an option) after air drying overnight.

- Pebeo Vitrea Glass Paint (at art supply stores) comes in a nice variety of colors. The jars are small but paint is a little thinner than Folk Art, so it was a little easier to apply but still really slow to cover and drain out the excess. It also pooled in the base of the bottle, even after being upside down over night. This paint is supposed to be heat set (not me just being impatient) but came out streaky, not opaque and with surprise bare spots. I think this paint would be best for painting, faux stained glass versus covering a larger surface.

- My recommendation for this project is clearly the 1-Shot Lettering Enamel. It might seem more spendy up front than Folk Art and you will not find it at Michael’s or JoAnns (try Amazon or art supply stores) but it will apply like a dream, cover several times more of the surface area and leave you with an even layer of color. You could probably blend colors if need be (e.g. add white etc). Do not dry in the oven, drying outdoors on a warm day but not in super hot or direct sun worked great.
Don’t hesitate to ask questions in the comment section!
Conclusion: not all stories have a happy ending, but don’t worry this isn’t one of those… only bummer is we were having too much fun at the actually birthday celebration to get good photographs of the centerpieces in action. Just this one lame shot that required cropping and zooming….. oh well! We had a blast!

Other tutorials – because there is always more than one way….

Great post thankyyou
Hi there, the whole thing is going perfectly here and ofcourse every one is
sharing data, that’s genuinely fine, keep up writing.
Fabulous, what a webpage it is! This web site provides valuable data too us, keep it up.