

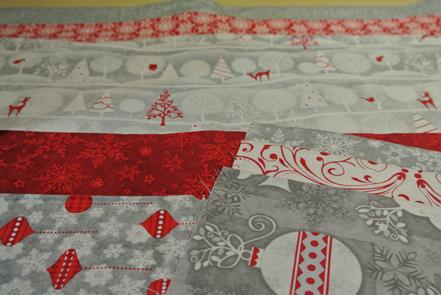
The Christmas Holiday theme around our house this year is red, gray and white. This tutorial guides you through a speedy, yet undeniably cozy, lap sized quilt, perfect for napping and decorating the back of a sofa or chair. This quilt is all about the central focus fabric, accentuated with three simple freehand geometric applique trees. The trees would be completely optional and likely depend on the fabric you chose for the center. You could also applique on large simple silhouettes of ornaments, snowman, candy canes, stars or packages or perhaps more intricate reindeer, snow flake or angels. North Pole’s the limit. Fabric is primarily from the Henry Glass Holiday Frost line.

Fabric required
- 1 yard focus fabric
- ½ yard cut of coordinating fabrics for first border and applique tree
- ½ yard cut coordinating fabric for second border
- ½ yard cut for flange and applique
- ¼ cut or fat quarter for third applique, or scraps
- 1 yard cut for outer border and binding
- Fabric for backing (I used flannel)
- Batting (I used Warm and Natural)
- Notice if focus fabric has an up and down or directional quality. Mine had a scene that clearly ran cut edge to cut edge so I had to rotate so the selvages were on top and bottom then I trimmed the selvage off plus one inch off each side of focus fabric so that the focus fabric is now a rectangle measuring about 32 x 40 (or so, no need too too exact, just consistent).
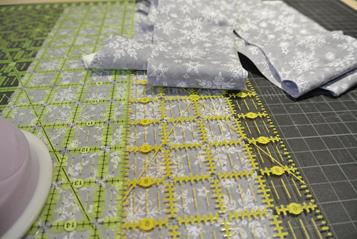
- Out of first focus fabric cut 4 strips 2 ½ wide x WOF (width of fabric). Trim off selvage and then join the strips on the diagonal so you have one large strip. Then start sewing down first strip to right edge of focus fabric, right sides together. Use a ¼ inch seam. After you finish sewing down the right side, trim the strip, rotate the center piece and line up the same fabric strip with the far edge of the piece you just sewed on and sew again, this time along the bottom edge. Repeat to sew the strip up the left side, then finish by sewing the strip across the top edge. This is just like sewing a log cabin square, only really big. Now you should have the focus fabric with a 2 ¼ inch wide board of the first fabric showing. Press the seam out.


- Out of the second focus fabric cut 5 strips 3 inch x WOF. Join them together into a long strip. Then repeat this same process as in step 2. Now you have the focus fabric plus two borders. Press seam out.


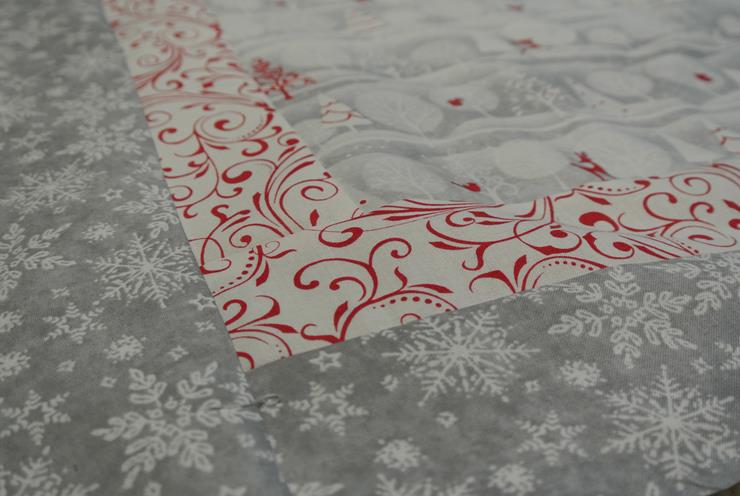
- Accent flange: Cut 5 strips 1 ½ inch wide x WOF. Join them together into one long strip then press then press in half the long ways, matching cut ends. This will leave you with a ¾ inch wide folded strip. Baste the flange down to the outer edge of the second border matching cut edges, using a seam just a scoush less than ¼ inch (so that it is hidden after the next or plan on ripping it out at the end.) As you can see, I sew a bit larger than ¼ inch (I use the edge of the foot). Had to rip out some at the end that was showing….

- Cut the final border fabric, 5 strips each 3.5 inches x WOF. Join them on the diagonal like you have in the other steps. Sew the last border just like you di the first two. This time you are sewing it through the flange and the other board. Press the seam out.
- Cut the binding strips. I like to use 2 ½ wide strips, joined on the diagonal (need 5-6). You can use all one fabric or scraps etc.
- Prepare your backing. I used wide flannel so no seams and extra cuddliness.
- Quilt the sandwich as you desire. I followed the lines in the focus fabric, didn’t quilt across the flange and did some stitch in the ditched for the borders.
- Applique. I like to applique after quilting but you can also do it on the quilt top before you add batting and backing. It can be easier; I just like to not have quilting lines running through my applique. Either way is a-okay. Trace your image onto paper then onto iron on interfacing (or straight onto interfacing). Remember to trace on right side (not the bumpy side) so your image isn’t reversed. After laying it out and pinning it place, I used a satin stitch and machine applique but there are several other techniques. My applique area is about 16 x 24 inches.

- Bind in your favorite way. Voila!

