

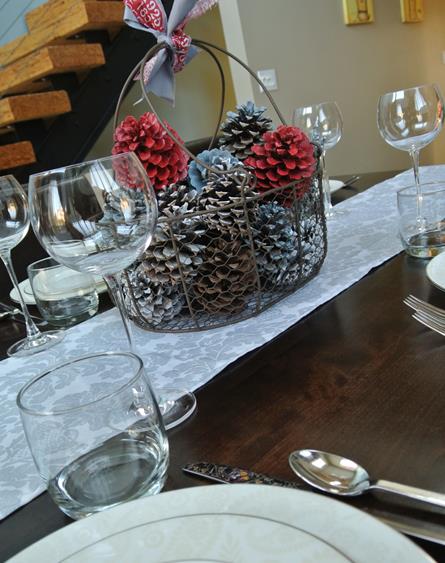
Need a quick table runner for a party or quick room spruce-upper? All you need is some fabric, sewing machine, thread, scissors, iron, pin or two and a little time… I made this quick table runner out of some yardage of sparkly cotton fabric I had in my stash. I had about a little less than two yards on hand – enough to make two good size runners, one that is about 9 feet long by 12 inches wide for our table and the other is 5 feet by 12 inches, for the buffet.
Instructions:
1. Measure your fabric length wise. Remember one yard of fabric is 3 feet long and about 40 – 42 inches wide.
2. Think about how long you want your runner. My table is about 6 feet long and I wanted some drape on either size. I also wanted to use up most of the sparkly fabric. Sooo….. you can cut the long length of fabric and then join to get the full length.
3. Think about how wide you want your FINISHED runner. I like a finished one that is 12-15 inches approximately. It fits nicely down the middle of the table without looking like a too small tablecloth or funny wide ribbon. I wanted to maximize the width of my fabric which was 42 inches wide. Remember you need to add extra fabric all the way around for the hem. For this I used an inch for the hem, and folded it in half to hide the raw cut edge (but more on that later).
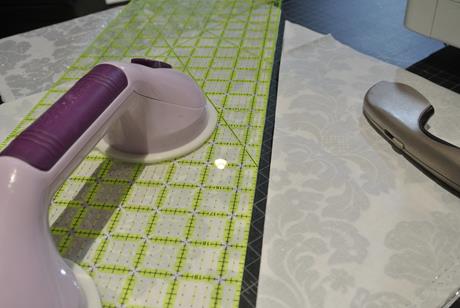
4. So now, come up with your plan to cut the fabric. I cut the fabric length wise into 14 inch strips (14 inches wide by length of fabric), creating 3 strips – each is 14 inches wide (14 x 3 = 42!). I left the selvage on because I knew that I could use it in the hem and it would be turned under/hidden. Iron fabric if wrinkly or creased.

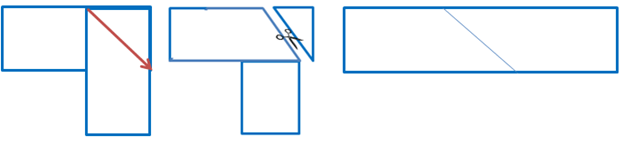
5. Now join the strips on the diagonal, if you chose, or straight across to make a longer strip. I only joined two of the three together for the big one, the other I saved for the shorter version. I like to join on the diagonal as it makes it less obvious sometimes BUT joining two straight edges is a-ok too. This is a great skill for quilting. Line up to strip in right sides together, with one perpendicular to the other. Then draw a diagonal line with a pencil and ruler from the top left corner to the lower right corner. This is the line you sew right over. Once sewn, trim off the extra to the RIGHT of the stitch line leaving ¼ inch to ½ inch of fabric. You will have two triangle scraps to save. Open it up and press the hem open (lays flatter for this project). Now you have one long strip TWICE the length of your original piece of fabric.

6. In this step you are going to finish with the hem. First with right side facing down on the iron board, press a 1 inch wide fold of fabric , then fold under the 1 inch fold, tucking the raw end in, leaving you with a ½ inch hem nicely pressed. You can pin it down if you like, but if you press it good and are working with cotton, it should be ok.

7. Now you are ready to sew. I like to sew on the top/right side of the fabric, lining my machine’s foot up with the end of fabric. You can use a straight stitch, zigzag or whatever you choose, so long as it catches the nicely folded and pressed hem underneath. I used my favorite wavy stitch. It is forgiving and hides when I might be a little crooked. For the corners you will want to probably try mitering them – below are links to tutorials that cover them quite nicely, if I do say so myself! I tend to just fiddle futz around until I get my “miter-looking” corner…. Full disclosure: not perfect nor truly mitered, but it works for me (hence the links to other tutorials). Finish the whole thing with another good press and display with great pride. Brag about how you just whipped it up for the occasion. 🙂
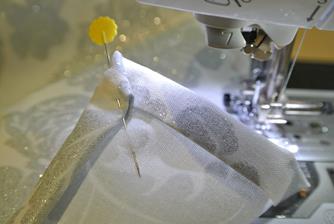
Table runners are a quick (faster than I can write a post about doing it!) and fun project, super easy and inexpensive way to decorate and if you ever get tired of it, you can just cut it up and make it into another project. These make great gifts too. You could also make napkins with this same approach, basically just cutting the fabric to the size you want and hemming by folding. Of course, if you have a overlock or serger you could forget folding and sewing and just use a napkin roll hem OR could serge the edge and and then press and sew hem to avoid too many loose ends. I have also in a pinch, just folded under the fabric and sewn with the raw edge exposed. It lasts until you wash it, then gets a little unravel-ly. Using pinking shears will help minimize this if you prefer. Remember, it is all about the fun pretty print you are displaying!
This post also features my red and grey pine cone obsession!
Here are some other great tutorials for simple and quick table runners
- http://www.needlenthread.com/2009/06/tutorial-mitred-corners-on-linen-square.html (straightforward mitered corner)
- http://www.livingwellspendingless.com/2011/03/15/party-diy-how-to-make-a-fabric-table-runner/
- http://www.positivelysplendid.com/2013/04/easy-table-runner-pattern.html
- http://www.thekitchn.com/weekend-project-sew-table-runn-92345
- http://www.aestheticnest.com/2012/09/sewing-quick-mitered-table-runner.html (great mitered corner pictures)
- http://www.sew4home.com/tips-resources/sewing-tips-tricks/how-sew-corner-aka-mitered-hem (best miter with options tutorial)
- http://www.apartmenttherapy.com/easy-home-diy-project-how-to-sew-a-table-runner-apartment-therapy-tutorial-197730 (because you know they will have cute ideas!)
- http://www.sewmuchado.com/2013/12/easy-diy-table-runner-tutorial.html (this one has additional backing fabric)

One thought on “Simple Fabric Table Runner – Tutorial”